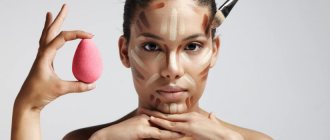
According to Nika, the sculpting technique, the meaning of which is to lighten and darken certain areas on the face, will help to correct the nose. To “sculpt” the desired shape, you will need dark and light shades of cream or powder texture. By the way, cream products will last much better and longer.
To make your makeup look as natural as possible, it is important to blend the edges of your beauty products well. Adding natural shadows and highlights will also help to avoid the mask effect. A highlighter will do the job perfectly.
If your nose is uneven
Such a defect occurs due to previous injuries or illnesses. Due to the fact that the shape of the nose in this case is individual, you can only use the general principles of correction.
Apply a dark tone to areas that need to be reduced, and light shades or highlighters to areas that need volume.
Let's say the nose is curved and, when viewed from the front, has a convexity on the right side and a concavity on the left. With such asymmetry, the right side is darkened, as in the case of a “potato” nose. The darkening area is defined where the bulge itself begins and ends.
Tips from makeup artists
Professional makeup artists use the following techniques to correct the shape or size of the nose:
- an emphasis on the lips, for example, using bright lipstick, will help distract attention from the nose;
- Correct eye makeup will help to achieve a visual narrowing of the nose without contouring - apply light shadows to the inner corners, highlight the outer ones with a darker tone;
- Another option to narrow your nose is to use cosmetics to reduce the distance between your eyebrows.
You can visually reduce your nose using your hairstyle. Torn bangs with uneven strands, volume of hair at the back of the head - with them the nose will look more miniature. But straight, long bangs do not hide the nose, as some people think, but, on the contrary, attract unnecessary attention to it.
The rest of the makeup
Nose correction will look natural and harmonious only if you use the same shades for the rest of your makeup. For example, a selected sculptor can be additionally applied to the cheekbone area to support the intended makeup course.
For daytime looks, makeup artists recommend avoiding active sculpting to avoid the mask effect. In most cases, applying a light highlight and shading it responsibly is enough. If you cannot do without a dark pigment, rely on the most natural shade possible.
For a beautiful look, apply your makeup near a window in natural light. This is the only way to make the transitions between shades smooth and imperceptible.
Keep in mind that correction of facial features is not always successful the first time - many girls need to practice several times to achieve their goal.
To achieve the desired result as quickly as possible, remember that the first movements of the brush should always be applicative, and subsequent movements should be soft and shading.
If you like to watch master classes from top makeup artists, you may have probably noticed that professionals in their field often apply makeup directly with their fingertips. For example, this method is welcome when creating a correction for dark circles under the eyes. However, when correcting the shape of the nose, it is recommended to use special accessories to gradually create a smooth border, and not just smudge makeup.
Makeup that completes nose correction may involve the design of plump lips or expressive eyes - these are excellent distractions from the problem area. In this case, you can also use a number of tricks from makeup artists.
What you will need
Makeup artists can easily use decorative cosmetics to correct facial features and bring them closer to ideal. However, ordinary girls can do this too – you just need to arm yourself with a few tools.
- Ideally, the entire process begins with applying a foundation or base. Many modern fashionistas have a primer in their makeup bag - a real lifesaver that evens out skin tone and promotes longevity of makeup. In daytime makeup, a primer can even eliminate the need for foundation.
- During corrective procedures, you will certainly need light cosmetics, which will embody a highlight in the makeup. There are many options - highlighter, light eye shadow, powder, corrector or special pencil. Depending on your preferences, you can choose matte or pearlescent products. However, the last finish is often only appropriate for an evening look. It is also worth considering that mother-of-pearl is completely unsuitable for problem skin, as it treacherously emphasizes all imperfections.
Makeup artists help fashionistas avoid common mistakes. They warn that when creating highlights, you should not use gray and marble tones, as well as cosmetics that are more than 2 shades lighter.
- When correcting facial features, a darker component is also useful. You can opt for foundation, beige shadows, stick or powder. A cold brownish tone suits most girls, but hints of reddishness are recommended to be avoided.
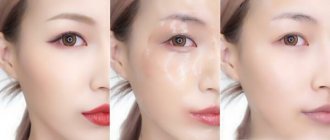
How to visually reduce your nose with makeup: step-by-step instructions
- Very often, the cause of girls' dissatisfaction is the nose - either it is not straight enough, or the width is not the same, or the length. But in each case, you can correct the shape of the nose using light and shadow techniques, which will be discussed further.
- All girls are endowed with a unique, special beauty, each of them is beautiful with her own individuality. But imposed stereotypes about ideal and symmetrical beauty, which are largely unattainable, often become the reason for girls’ low self-esteem, and their lives turn into a joyless existence.
- If you know this first-hand, but some features of your face or body plunge you into the abyss of despondency and make you unhappy, then it’s time to act.
Recommendations
So, step-by-step instructions on how to visually reduce your nose with makeup:
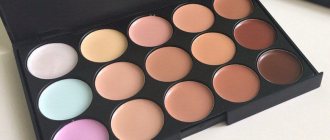
- Step 1. Select contouring products. If the darkening-lightening technique is still new to you, then eminent artists in the make-up industry recommend starting with the use of powder texture products. They apply more naturally and are easier to blend. Don't forget to use quality makeup brushes. A good brush with natural bristles is the key to creating the smoothest transition of powder products on the face.
- If you are ready for more radical actions and have already become a little more advanced in technology, then choose creamy products. They give a denser coverage, last longer, but are more difficult to shade. Creamy textures are also somewhat more difficult because they are shaded with fingers or special sponges, or several types of brushes, which requires certain skills.
- As for color, many nuances need to be taken into account. For example, if you don't know exactly what your base skin tone is, you won't be able to adequately select both darkening and lightening products. Therefore, for the first time, you will need a palette with 12-15 shades , from which, through trial and error, you can choose the ideal set. After which, you can switch to minimalism and choose a set of 3 products: blush, highlighter and highlighter . This minimal set will help you perform basic makeup for any occasion, but you need to have some experience in applying all these steps.
The lightening agent should be 1-2 shades lighter than the natural skin tone, and the darkening product should be 1 shade darker. Otherwise, the contouring will be very noticeable and look out of place.
Recommendations
- If you need to achieve the most natural look, then choose products without excess shine, shine or pearl; only matte products will look good in bright daylight. Leave shiny and shining cosmetics for evening outings or photo shoots.
- The color that we will use to darken the unwanted areas of the nose should ideally match the color of your own shadows on the face, which means it is the darkened areas of the face that you need to focus on when choosing a shade. The most common natural shade color is a cool brown-gray shade. Golden brown shades are only suitable for very tanned faces, and orange undertones are generally rarely used for contouring purposes.
- Step 2. The most important rule of contouring is a well-prepared face. Therefore, it is very important to take care of your skin daily, nourish it, moisturize it, and remove makeup. After your morning ritual of cleansing and moisturizing, you can begin applying your base. The choice of base is strictly individual, and occurs, as a rule, by trial and error, and this is a topic for a separate article. Now let’s assume that the base is already at hand. Therefore, we apply the usual base - be it a set of concealers or a light foundation veil, depending on what you need.
Recommendations
- The base will be needed to visually even out the skin tone, hide imperfections, if any, and create the initial conditions so that the makeup stays even and long. Moreover, if you plan to apply powder contouring products next, then you need to lightly powder your face. And if contouring is done with cream textures, then it is better to apply them on a cream base so that the products lie more evenly and do not roll down.
- And finally, a small life hack to visually make your nose look smaller with makeup - you can even use self-tanner as a darkening agent. It must be applied according to the rules of contouring, but on a clean face, before applying the main tone. This way, the shadows will last better and the face will look as natural as possible, not overloaded with makeup. However, it will be difficult for a beginner to perform contouring using this technique, because self-tanning does not forgive mistakes, and it will be difficult to wash it off if something goes wrong.
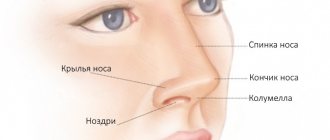
- Step 3. Determine the shape. To understand well what needs to be hidden and what to emphasize, you need to conduct a detailed analysis of your appearance. In the picture below you can see the ideal proportions and relationship of the parts of the face to each other. This knowledge will be very useful to us for further makeup, so that you understand exactly what you need to focus on when drawing darkening or lightening lines.
Form
- Step 4. Let's start contouring. Do not forget about high-quality brushes - they must be high-class, otherwise it will be very difficult to achieve good shading, especially for a beginner.
Contouring
- At this stage, we begin applying light and shadow elements that will help give your nose the desired shape.
- At the previous stage, we already determined what types of nose there are. Now, we’ll tell you a detailed action plan for each option.
Photos before and after rhinoplasty
Chronic pathologies are considered limitations:
- hemophilia;
- severe renal or liver failure;
- sexually transmitted diseases (including syphilis, gonorrhea, AIDS);
- tuberculosis;
- diabetes.
Rhinoplasty has a number of advantages and disadvantages. After the operation, the patient gains self-confidence. The lack of embarrassment in front of others is considered the main advantage. Disadvantages include breathing problems caused by improperly performed surgery.
Girls with a wide nose are offered two types of surgery:
- back correction;
- wing correction.
The first type of surgical intervention includes several methods of correction: if the back is high, then it is shortened, if the back is short, it is lengthened, and if the back is wide, it is narrowed, displacing the cartilages.
Correction of the nasal wings is indicated for people with asymmetrical or wide nostrils.
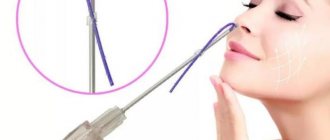
Rhinoplasty is performed using two methods:
- contraction of the nasal openings;
- removing excess tissue.
There may be a small seam at the incision site.
There are also 2 methods of rhinoplasty (by type of intervention):
- open;
- closed.
Open plastic surgery involves dissection of organ tissue, allowing access to the internal structure. Scars after this operation are more noticeable. With closed plastic surgery, marginal incisions are made. There are practically no scars left after surgery: the arteries are not damaged during the operation.
To eliminate aesthetic defects, a closed type of rhinoplasty is more suitable. To reduce a wide nose, laser intervention is performed.
The operation has many advantages:
- short rehabilitation period;
- almost complete absence of edema;
- minimal risk of bleeding;
- the most accurate and rapid tissue excision.
In most cases, patients are allowed to go home after 12-24 hours. To minimize the risk of complications, it is necessary to regularly treat the sutures and adhere to a gentle regimen. During the rehabilitation period, you should not go to the pool, wear glasses, sunbathe, or overload the body.
Possible complications include hematomas, edema and hypertrophy. Bruises go away on their own within 45-60 days. Hypertrophy with adequate treatment disappears within 2 weeks.